 批量生成并打印文件
# 批量生成并打印文件
注意
本文中展示的代码均为关键代码,复制粘贴到您的项目中,按照实际的情况,例如文档路径,用户名等做适当修改即可使用。
在现代数字化办公环境下,随着云计算和互联网技术的发展,在线编辑与处理Office文档已成为企业日常运营不可或缺的一部分。尤其对于那些需要频繁处理Word、Excel等Office文档的企业来说,具备在线编辑、生成及打印文档的能力至关重要。
针对这一挑战,PageOffice提供了一种创新的解决方案。PageOffice是一款专为Web应用设计的Office文档在线处理组件,它不仅支持用户在线编辑Word、Excel等Office文档,还提供了独特的FileMaker组件,实现了Office文件的在线批量生成与批量打印功能。这一特性在当前市场中堪称独树一帜。
FileMaker作为PageOffice的一个内置组件,其设计完美契合了PageOffice的整体架构。它提供了一个简洁的对象模型,可以视为一个无界面版的PageOffice。FileMaker能够在客户端后台无缝地将数据填充至预设的Office模板中,自动生成所需的文档,并自动上传至服务器端,整个过程无需打开或显示生成的文档。而且,FileMaker提供了生成文档时的进度接口,开发人员可以轻松地监听文档生成过程中的进度,根据实际需要,实现自定义的进度提示。
尤为值得一提的是,FileMaker通过调用Office的原生接口来操作文档内容,确保了生成的文档保持原有的格式和质量。更重要的是,由于FileMaker利用的是客户端计算机上已安装的Office软件进行文档的生成工作,因此服务器端无需额外安装Office程序,也不受操作系统限制(即服务器可以不是Windows平台),这样不仅减少了服务器端的资源消耗,还提高了系统的兼容性和灵活性。
由于FileMaker还支持文档生成后自动打印的功能,所以结合其批量生成文件的能力,就能够实现带自定义处理进度的批量生成和打印Office文件的功能,这对于需要定期制作大量报告、合同或其他文档的企业来说,无疑是一项极为宝贵的功能。通过这种方式,企业可以大幅度提高工作效率,减少人力成本,同时确保文档的质量和一致性。
使用PageOffice实现批量生成文件并打印的功能,只需两步:
- 首先调用FileMakerCtrl对象和WordDocumentWriter对象实现动态填充Word模板生成正式的Word文件并自动打印。
- 然后循环执行上一步操作,实现批量生成文件并打印的效果。
下面就以“批量生成并打印学生入学通知书”为例,介绍如何使用PageOffice实现批量生成并打印文件的功能。
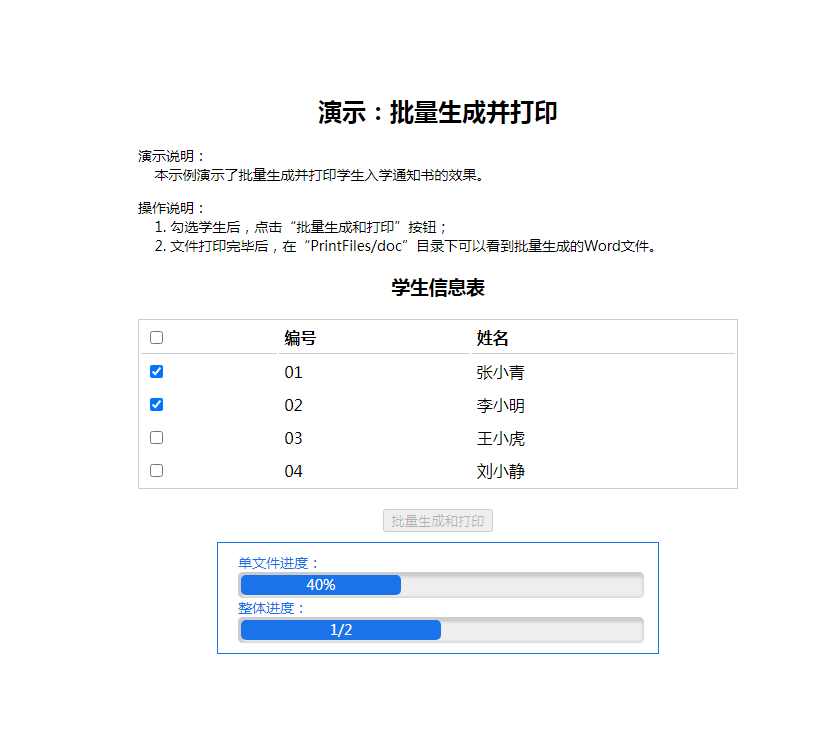
需求效果:在页面上勾选需要生成通知书的学生,然后点击批量生成和打印的按钮,就可以把各个学生的信息动态填充到入学通知书的Word模板中,为每个学生生成一份入学通知书,并自动打印出来。
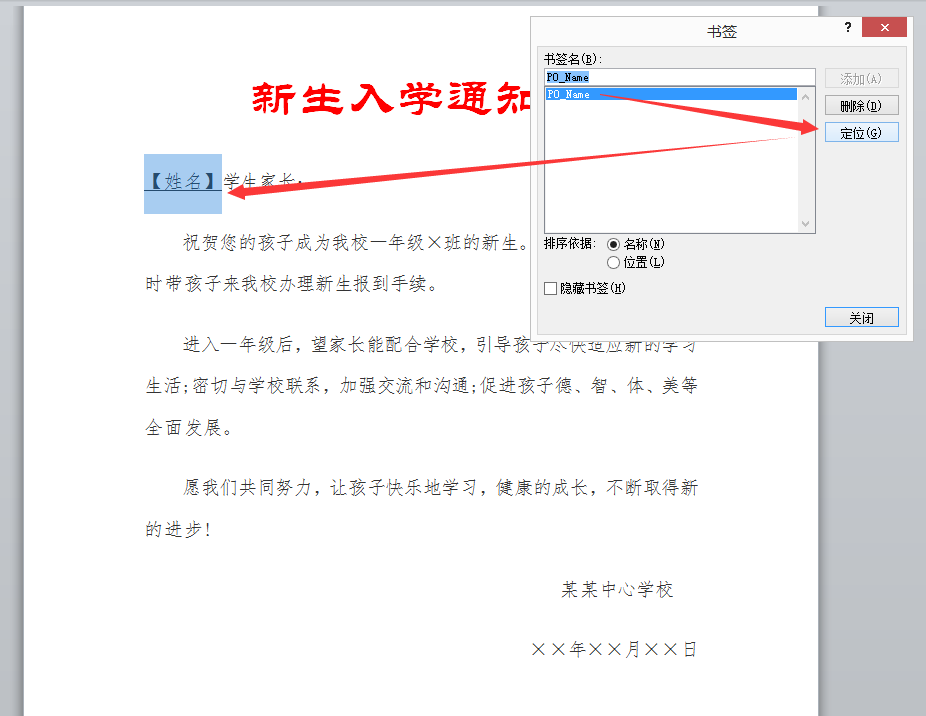
入学通知书模板如下图所示,为了简单起见,只使用了学生姓名来代表学生的所有信息,所以模板中只用了一个数据区域“PO_Name”来标记学生姓名的位置。
为了简单起见,下面介绍一下批量生成两名学生入学通知书的过程。比如用户勾选了两名学生后,点击批量生成和打印的按钮,如下图所示。
点击按钮后,重复调用FileMaker组件,把学生信息动态填充到Word模板中生成入学通知书(比如后端代码编写在:/Print),直到所有的入学通知书都生成并打印完毕。用黑白打印机打印效果如下图所示。(具体实现请参考下面的前端代码。)

FileMakerCtrl 和 PageOfficeCtrl 的区别
FileMakerCtrl 本质上就是一个没有界面的 PageOfficeCtrl,也是调用客户端 Office 程序处理文件的,FileMakerCtrl和PageOfficeCtrl都可以实现对文档进行动态填充、动态转 PDF 等功能,唯一的区别就是 FileMakerCtrl 在线打开填充和转换文档的时候,Web页面不会打开显示文档内容,而 PageOfficeCtrl 会弹出窗口打开显示文档内容。
# 后端代码
- 在后端编写代码实现文档动态填充,比如/Print中关键代码如下:
    @RequestMapping(value = "/print")
    public void filemakerWord(HttpServletRequest request, HttpServletResponse response, int id) throws IOException {
        String[] studentArr = {"", "张小青", "李小明", "王小虎", "刘小静"};

        FileMakerCtrl fmCtrl = new FileMakerCtrl(request);
        WordDocumentWriter doc = new WordDocumentWriter();
        doc.openDataRegion("PO_Name").setValue(studentArr[id]);
        fmCtrl.setWriter(doc);
        fmCtrl.fillDocument("/doc/PrintFiles/template_tz.doc", DocumentOpenType.Word);
        response.getOutputStream().print(fmCtrl.getHtml());
    }
// Make sure to add code blocks to your code group
- 在SaveFilePage属性指向的地址接口中,创建FileSaver对象处理文件的保存工作。
    @RequestMapping("save")
    public void save(HttpServletRequest request, HttpServletResponse response, String id) {
        FileSaver fs = new FileSaver(request, response);
        String fileName = "tongzhi" + id +  fs.getFileExtName();
        fs.saveToFile(dir + "PrintFiles/" + fileName);
        fs.setCustomSaveResult("ok");
        fs.close();
    }
// Make sure to add code blocks to your code group
# 前端代码
编写前端网页代码,实现批量生成文件并打印的效果。
<script setup>
import request from '@/utils/request';
import { ref, onMounted } from 'vue';
import { filemakerctrl, POBrowser } from 'js-pageoffice';
const students = [
{ id: 1, name: '张小青' },
{ id: 2, name: '李小明' },
{ id: 3, name: '王小虎' },
{ id: 4, name: '刘小静' },
];
const titleText = ref('');
const selectedStudents = ref([]);
const isButtonDisabled = ref(false);
const progressBar1Width = ref('0%');
const progressBar1Text = ref('0%');
const progressBar2Width = ref('0%');
const progressBar2Text = ref('0/0');
const errorMsg = ref('');
onMounted(async () => {
try {
const response = await request({
url: '/index',
method: 'get',
});
titleText.value = response;
} catch (error) {
console.error('Failed to fetch title:', error);
}
});
function PrintFiles() {
if (selectedStudents.value.length === 0) {
alert('请至少选择一个学生');
return;
}
isButtonDisabled.value = true;//禁用按钮,防止重复点击
PrintFile(selectedStudents.value, 0);
}
function PrintFile(idArr, index) {
filemakerctrl.SaveFilePage = "/PrintFiles/save?id="+ idArr[index];
filemakerctrl.SetPrint(); // 打印
filemakerctrl.CallFileMaker({
url: "/PrintFiles/print?id=" + idArr[index],
success: () => {
console.log("completed successfully.");
setProgress1(100);
index++;
setProgress2(index, idArr.length);
if (index < idArr.length) {
PrintFile(idArr, index);
} else {
isButtonDisabled.value = false;//所有文件转换完毕后启用按钮
}
},
progress: (pos) => {
console.log(`running ${pos}%`);
setProgress1(pos);
},
error: (msg) => {
errorMsg.value = `发生错误:` + msg;
console.log(`error occurred: ` + msg);
isButtonDisabled.value = false;//启用按钮
},
})
}
function setProgress1(percent) {
progressBar1Width.value = `${percent}%`;
progressBar1Text.value = `${percent}%`;
}
function setProgress2(index, count) {
progressBar2Width.value = `${Math.round((index / count) * 100)}%`;
progressBar2Text.value = `${index}/${count}`;
}
</script>
<template>
<div class="Word">
<div style="text-align: center; margin-top: 30px;">
<h3>演示:批量生成并打印</h3>
<div style="width: 600px; margin: 0 auto; font-size: 14px;">
<p style="text-align: left;">
演示说明:<br/>
本示例演示了批量生成并打印学生入学通知书的效果。
</p>
<p style="text-align: left;">
操作说明:<br/>
1. 勾选学生后,点击“批量生成和打印”按钮;<br/>
2. 文件打印完毕后,在“PrintFiles/doc”目录下可以看到批量生成的Word文件。<br/>
</p>
</div>
<hr />
<ul class="student-list">
<li v-for="(student) in students" :key="student.id">
<label>
<input v-model="selectedStudents" :value="student.id" type="checkbox" /><span>{{ student.id }}</span> {{ student.name }}
</label>
</li>
</ul>
<input id="Button1" type="button" value="批量打印" @click="PrintFiles" :disabled="isButtonDisabled" /><br />
<div id="progressDiv">
单文件进度:
<div class="progressBarContainer">
<div
:style="{ width: progressBar1Width, height: '20px', backgroundColor: '#1A73E8', borderRadius: '5px', textAlign: 'center', lineHeight: '20px', color: 'white' }">
{{ progressBar1Text }}
</div>
</div>
整体进度:
<div class="progressBarContainer">
<div
:style="{ width: progressBar2Width, height: '20px', backgroundColor: '#1A73E8', borderRadius: '5px', textAlign: 'center', lineHeight: '20px', color: 'white' }">
{{ progressBar2Text }}
</div>
</div>
<div id="errorMsg">{{ errorMsg }}</div>
</div>
</div>
</div>
</template>
<style scoped>
.progressBarContainer {
width: 100%;
background-color: #eee;
border-radius: 5px;
padding: 3px;
box-shadow: 2px 2px 3px 3px #ccc inset;
}
.progressBar {
height: 20px;
width: 0%;
background-color: #1A73E8;
border-radius: 5px;
text-align: center;
line-height: 20px;
color: white;
}
#progressDiv {
width: 400px;
margin: 10px auto;
text-align: left;
font-size: 14px;
border: solid 1px #1A73E8;
padding: 10px 20px;
color: #1A73E8;
}
#errorMsg {
color: red;
}
.student-list {
list-style-type: none;
padding: 0;
margin: 0 auto;
width: 400px;
}
.student-list li {
display: flex;
justify-content: space-between;
align-items: center;
margin-bottom: 10px;
}
.student-list label {
display: block;
font-weight: bold;
margin-bottom: 5px;
}
.student-list input[type="checkbox"] {
margin-right: 5px;
}
</style>